 Hello World! I’m sad to say I woke up this morning to overcast skies and a general feeling of lethargy that comes with rainy days. I can only hope that the vegetables I planted yesterday (post to come!) are holding up under all this water. I’m a college student, so I’m fully enjoying my precious lazy-days of summer and the inclement weather is quite a buzz kill. Gone are my dreams of soaking up rays of sunshine and Vitamin D. Instead, I’m facing the reality of lots of quality time with the sofa *insert sloth mode here* ;). Oh well! I dooo miss my couch a lot while I’m at school. And as the saying goes, when life gives you lemons make lemonade.
Hmmm, now that I think of it this day could be perfect… if only it were accompanied by some roasted artichokes and my signature tangy, creamy dipping sauce. YUM. Are you drooling yet?! Well get ready to feast your eyes on some major food porn and an outstanding recipe. Follow my directions and you will transform those tough artichoke leaves into tender slivers of heaven. The perfect vehicle for my light and creamy garlic herb dip!

My favorite part about this dish is that artichokes are super healthy and chockfull of fiber, folic acid and loads of vitamins and minerals. In fact, ancient Greeks and Romans considered artichoke to be an aphrodisiac and pregnant women were encouraged to feast on this meaty veg to ensure the birth of a son! Sexism aside, if it’s good enough for the Ancients it’s certainly good enough for me. The BEST news (you didn’t think it could get any better did you?!) is that artichokes are in season right NOW! As in go out immediately and get yourself some ‘chokes! I promise it’s worth the trek off the couch and into the rain. In addition, I highly recommend you make the dipping sauce – it’s light (using greek yogurt and reduced fat mayo) and is just tangy enough to bring out the citrusy flavor of the artichoke. Enjoy!
-Tita

ROASTED ARTICHOKES AND TANGY DIPPING SAUCE
Ingredients:
- 2 Artichokes
- 6 cloves of garlic (it seems like a lot, but trust me it’s just right!)
- several sprigs of fresh thyme
- ¼ cup extra virgin olive oil and additional olive oil for drizzling
- ½ cup 0% plain greek yogurt
- ¼ cup reduced fat mayonnaise
- 1 tsp. ranch seasoning
- ¼ cup chopped red onion
- 2 tbsp. Dijon mustard (I particularly like Grey Poupon, but use whatever brand is your favorite!)
- juice of 1 lemon
- 1 tbsp. fresh thyme coarsely chopped
- Salt and Pepper


Directions:
- Preheat oven to 400°F
- Rinse artichokes under cool water to get off any dirt. Cut off woody stem – make sure to cut enough to make a flat bottom, allowing artichokes to stand straight. Trim off all the spiky points of leaves (careful, they’re sharp!).
- If some outer leaves seem super tough, remove them. Continue snipping off sharp tips until you reach the center. Some sharp tips will be in here so make sure to really dig your scissors in!
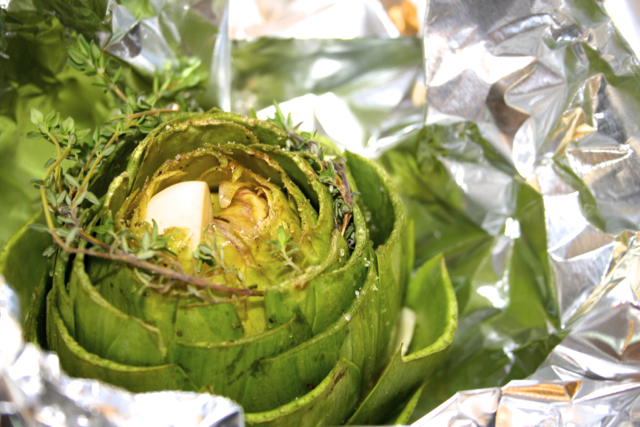
- Cut two cloves of garlic into long, thin slices. Place slices in between layers of leaves. 1 clove of slices per artichoke. (See above image for visual).
- Stuff two garlic cloves into the center of each artichoke. Push them down right on top of the heart.
- 6. Place each artichoke into foil – don’t seal yet! Note: I like to double wrap mine with one smaller piece of foil wrapped tightly around artichoke and another larger piece to insulate – but you could probably get away with one layer.
- Drizzle each artichoke with olive oil (I’d say at least 1 tbsp. per choke) and season well with salt and pepper. Cover with one or two sprigs of thyme. Seal foil tightly around chokes.
- Place chokes in pan on medium-low rack in oven and roast for 1 hour.
- Remove from oven and allow to cool until able to handle. Open up foil (careful! hot steam will be coming out) and remove the garlic cloves from centers with small fork.
- Place garlic cloves, greek yogurt and mayonnaise in blender. Blend to combine. Add ranch seasoning, red onion, mustard and thyme. With blender running, gradually add in lemon juice and olive oil (alternating between the two). It should be nice and creamy – if too thick add a bit more olive oil. Season with salt and pepper to taste.
- Transfer dip to dish and serve alongside chokes!
Note: If you’ve never had an artichoke before it’s important to know that you only scrape the meaty part of flesh with your teeth! Dip the leaves into dip and scrape to your heart’s content! Once the leaves are gone you’ll be left with a weird looking center part covered in translucent purple leaves – sounds yummy right! haha – to get to the heart you have to remove the tough fibrous part (called the choke). You should be able to push it off with with your fingers and reveal the soft, luscious meat beneath! Buen Provecho!


